Writing
How to sew up the signatures of a book?
This is an instruction writing on book binding. By imagining standing side by side with the reader, it’s a practice on translating actions into words that structures the readers’ experience.
In the context of book-binding, a signature refers to a section of paper. All the paper of a book are divided into several signatures and then sewn together. The number of paper in a signature varies, there might be one or more than one, depending on the thickness and size of the paper and the content of the book.
Bookbinding seems rather old-fashioned in the information age. But making a book step by step with your own hands provides an experience that a Kindle or an iPad could never give you. For example, when making an electronic book, the main concerns are the size of the screen and the content layouts. A bookmaker has to make a lot more decisions, such as the characteristics of the paper, the most suitable binding methods for the content, the thickness of the glue, etc. It is a slow and sometimes painful process, but the reward in the end is a unique handmade book.
To put together a book by yourself consists of six steps:
1. Prepare the signatures and the tools, and set up the working space;
2. Sew up the signatures;
3. Glue and trim the signatures;
4. Make a book cover (either soft or hard cover);
5. Attach the signatures to the cover;
6. Press and polish.
In this article, I will focus on how to sew up the signatures. You only need three skills to sew the signatures of a book. They are
– The ability to use needle and thread (to sew the signatures together);
– The ability to make knots at certain points in the sewing process;
– And hand-eye coordination to perform the intricate work.
It is not difficult to bind a book. What you need most is patience and attention to detail.
These tapes are specially for bookbinding and the length of the tapes depending on the your page numbers.
Generally speaking, four feet of thread can sew eight signatures.
Here are the things you need before you start.
- A pile of signatures (drilled and stacked);
- A long, flat and smooth working table;
- Two four-inch cloth tapes;
- A needle (of middle size) ;
- Linen thread;
- A piece of beeswax;
- A pair of scissors;
- Several weights for pressing.

If you are left-handed, you can put them in the other end.
It is important to notice this when you are making a book with content, the direction of the page depends on your content.
Here I assume you have already drilled holes in your signatures. The number of holes depends on the size of your book, but generally speaking, it’s always an even number. There is an entrance hole at the top of the page and an exit at the bottom. Within them are two or three pairs of holes to stabilize the tapes.
Step 1: set up the working space.
Stand/sit at one end of the working table, and place your stack of signatures to your left hand side.
Place the last signature on the right edge of the table , beyond the edge for about 0.25 inches.
Place the tapes between the hole 2&3 and 4&5. Place a weight on the other side of the paper.


You can measure it with your arm: the length of one and a half of your arm is the most suitable length.
Step 2: coat the thread with wax
Waxing the thread helps your thread stay tangle-free, and will make making knots easier in the following steps.
Cut four feet of thread and coat it with bee wax. Pinch one end of the thread with your right thumb and index finger, with your left thumb slightly pressing the thread to the wax. Drag the thread all the way through the wax and repeat it two to three times. Then do to the other end of the thread.

This is the single-thread method. You can use double thread if you like and know how to do so.
Step 3: Thread the needle
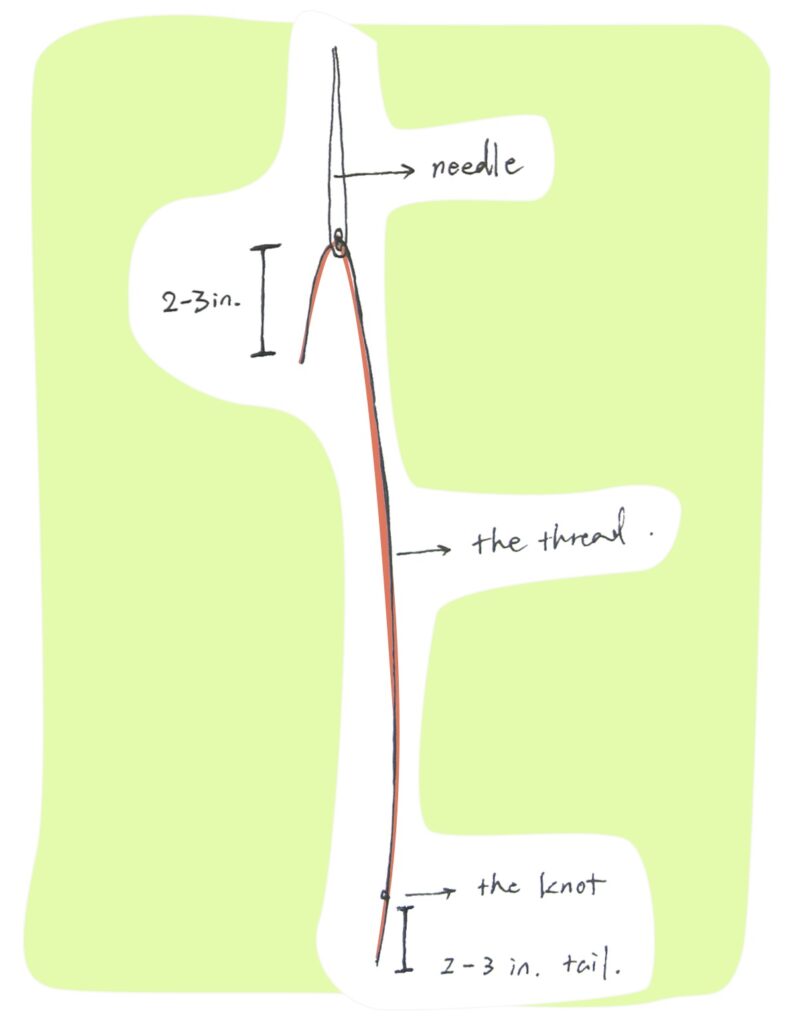
Pull one end of the thread through the needle, leaving 2-3 inches in length. Make a knot at the other end of the thread – also leaving a tail with 2-3 inches.
Step 4: Sew the first signature.
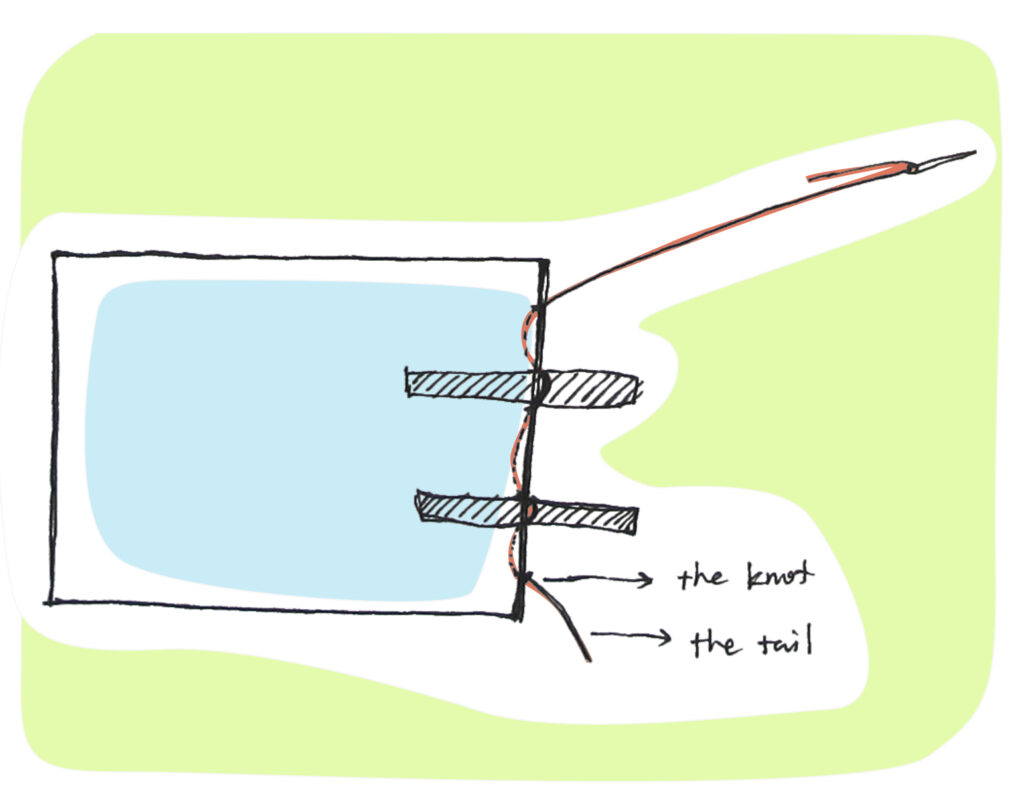
With your left hand gently holding the paper in place, tour the needle through the paper. The needle goes into the page from 1.6.
After you pull the needle through the hole, put it down on your left side and use your right hand to pull the rest of the thread into this side of the page.
Then pull your needle out from 1.5. Always remember to use your right hand to gently drag the thread through instead of pulling it all the way with the needle. Or you might tear the paper. Cross the needle over tape two and insert it into 1.4. Pull it through 1.3. Then cross over the tape 1 and go into the page from 1.2. Come out from 1.1.
Pull the thread a little harder when it goes out from the page, but be careful not to pull too hard or you might tear the page. If you accidentally tear the page, return the thread from this hole and make a new hole ahead of the old one, then continue.
Once you have finished step 4, your first signature should look like this.

Step 5: Sew the second signature.
Place the second signature on top of the first one and align the four edges with the first page. The thread goes into the page from 2.1, then goes out from 2.2. This time, you need to make a knot first with the thread, between hole 1.2 and 1.3. The needle goes through the thread and leaves a small loop in the end. Then pull your needle through the loop and tighten it close to 1.2.
Then pull your needle into the paper through 2.3 and pull out from 2.4. At 2.4, make a knot and then pull the needle through 2.5 and 2.6.
Once the needle goes out from 2.6, make a knot with the thread. Cut off the excess string.
After you finish this step, the two signatures should look like this:
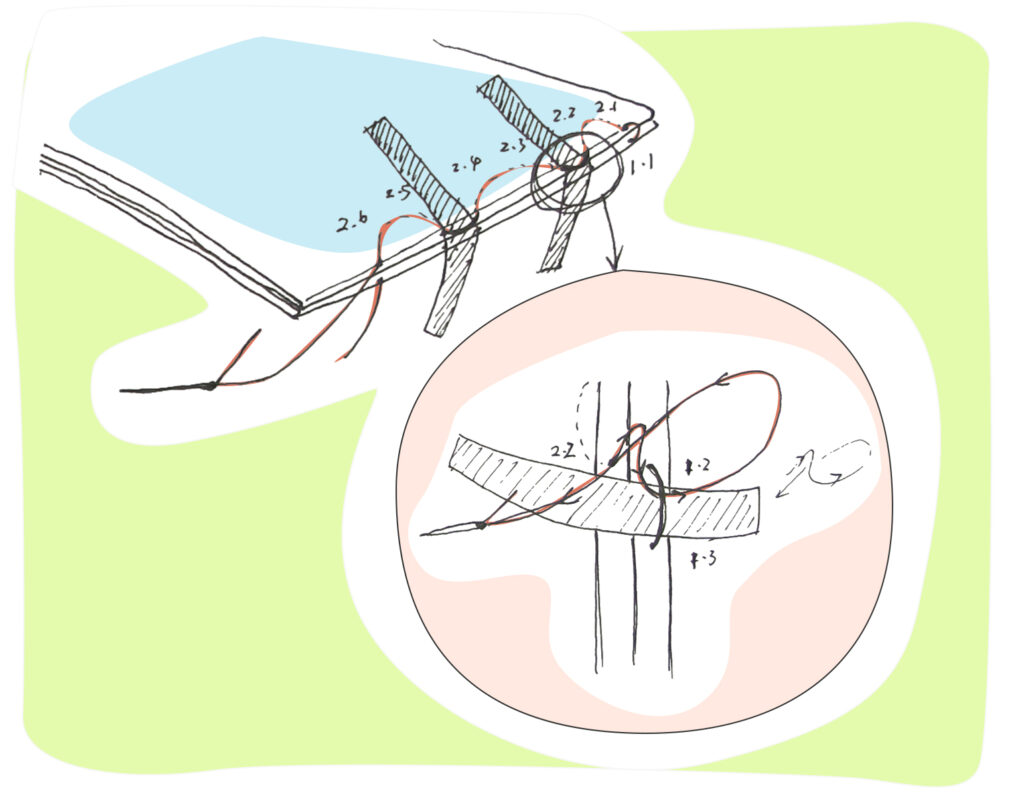
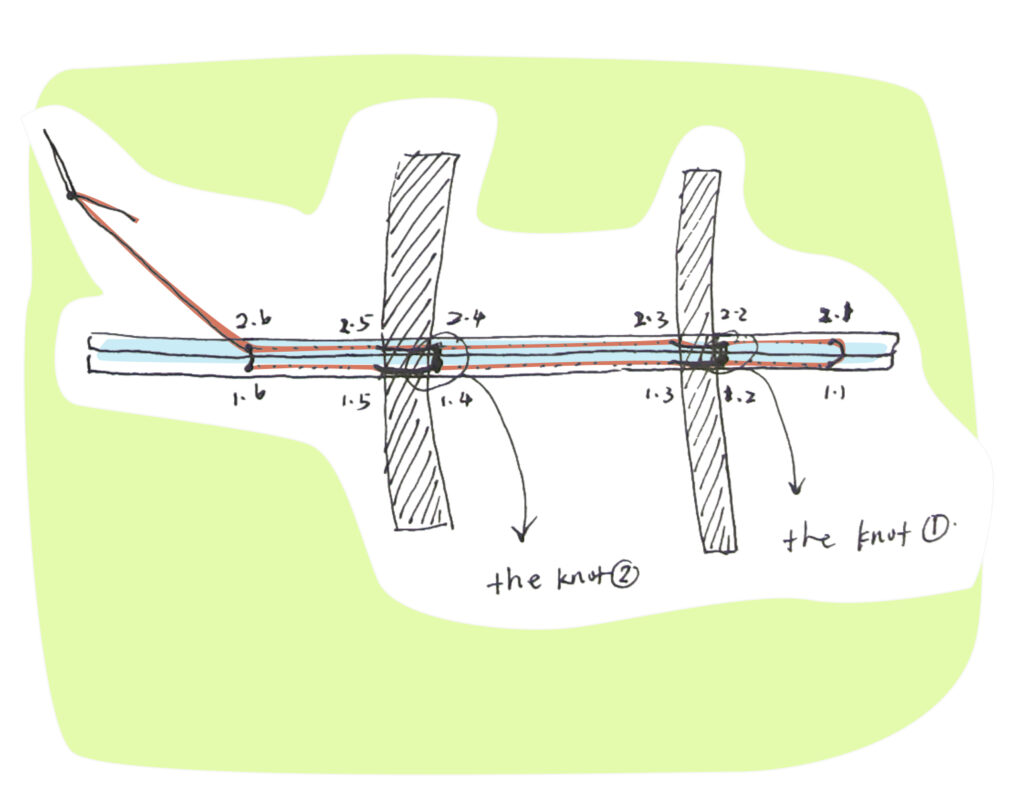
The knots move to the opposite direction of the thread: if the needle moves upwards, make the knots at the bottom; if the needle moves down, make the knot upwards. The knots help to connect all the signatures together; while alternating the direction of the knots prevents uneven force within the pages.
Step 6: Sew the third signature.
The needle goes into the third page from 3.6. Then goes out through 3.5 and makes a knot with 2.5. Then thread the needle through 3.4 to 3.3, make a knot, and so on and so forth.
When the needle goes through 3.1, you need to connect the thread with the first and second signatures. At the end of each row, loop your thread under the thread of the previous signature, and then again through the loop that you just made.
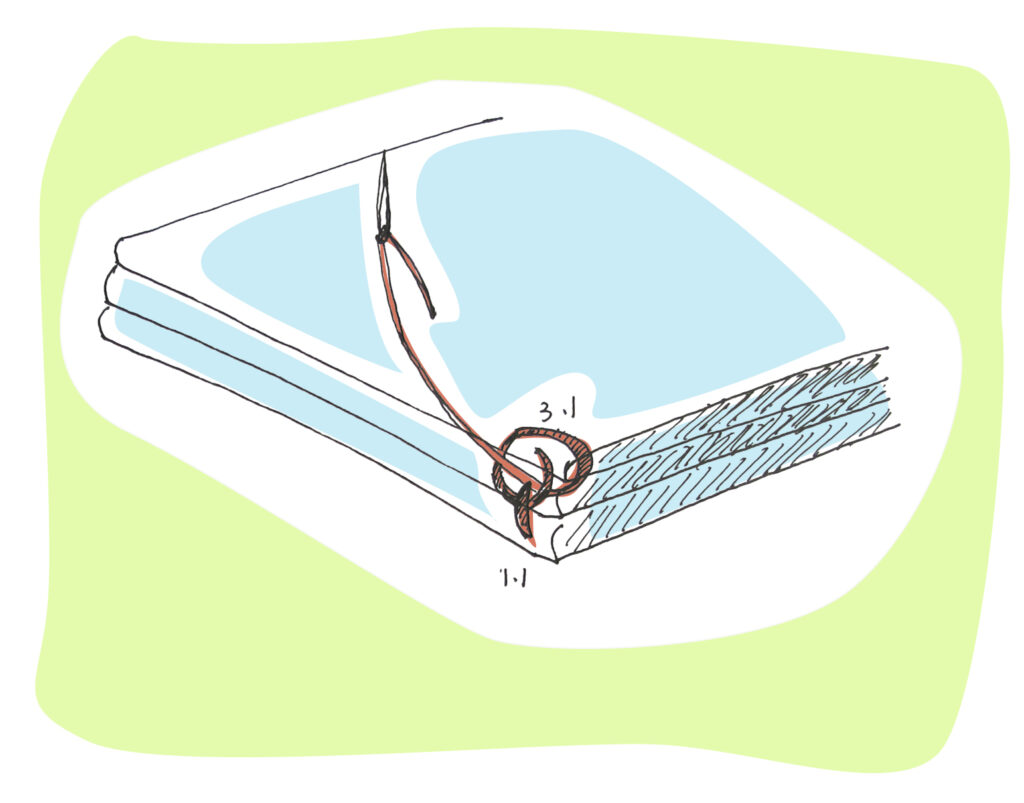
Step 7: Sew the fourth signature.
Guide your thread in from 4.1 and 4.2 and make a knot. Then moves to 4.3 then 4.4 and make a knot; then 4.5 and 4.6. This time, the needle loops the thread under the thread of 2.6 and 3.6 and then through the loop.
This is how your four signatures look like when you finish this step.
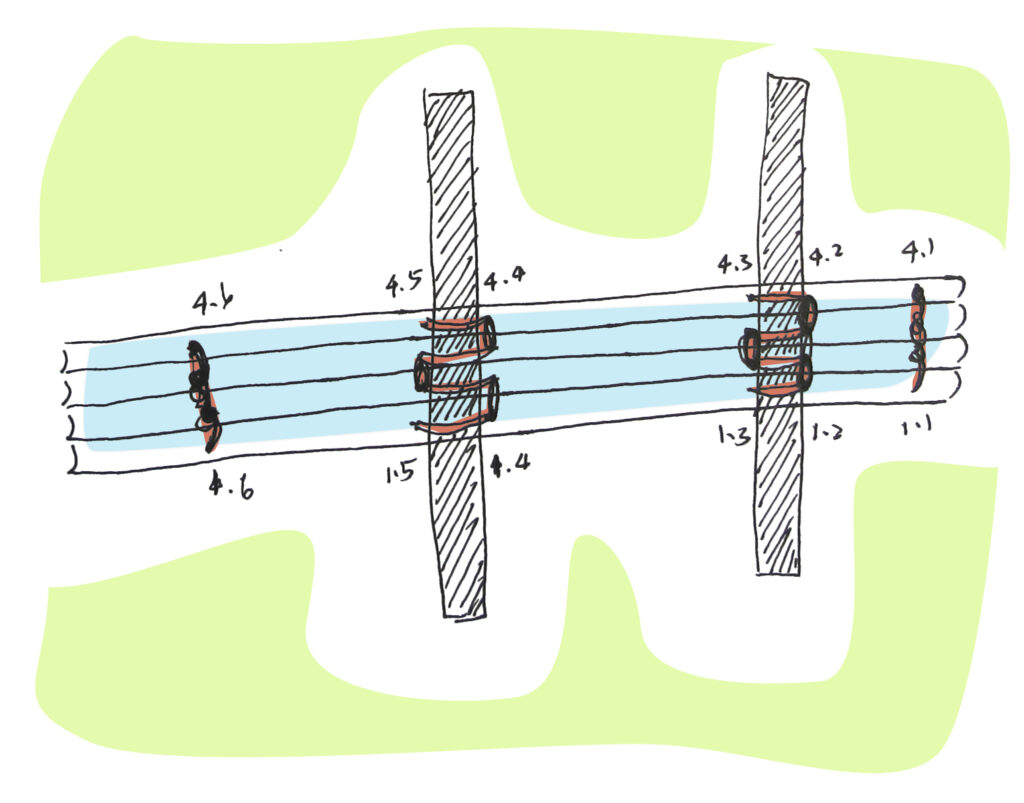
You can continue these four basic steps until you have sewn all your signatures together. There are two questions you might ask in the following sewing part:
Q1: What if the thread ends, how to continue?
A: Once you find the length of your thread less than half the length of your page, you can choose either to keep the thread inside the page or outside. (Tip: if you keep the thread inside the page, you might see the knots when you turn to that page; but if you keep it outside of the page, the knots will be glued and covered.)
Then repeat the same preparation as step 2 and step 3, except that you don’t need to make a knot on the thread first. Instead, make a knot using the thread and the tail of the previous thread. Then you can continue the to sew your signatures.
Q2: Once I finish all the signatures, how to make an end?
A: When all the signatures are sewn together, make a loop with the previous thread, then make a knot and repeat it once. Then cut the tail.
Now you are ready for the next step: glue and trim the signatures. 🙂